GREASEGUN.jpg
Item # Description Abnox No.
1 Gun Head H30614
2 Lever H32305
4 Spiral pin H84630
5 Piston H32340
6 X-ring H82495
7 Spiral pin H84684
8 Torsion spring K81699
9 Washer K80365
10 Rotary Coupling B32325
11 Washer K80128
12 Gauge (Glycerin) K83746
13 Pressure spring K81384
14 Valve Plug K30643
15 Non-return Valve B 30508
16 Barrel seal K80657
17 Piston seal K83576
18 Joint pad K80162
19 Guide H32329
20 Pressure Spring K81763
Item # Description Abnox. No.
21 Support B39075
22 Chain N83901
23 Spiral Pin N84681
24 Lining H39096
25 Flat Washer N82471
26 Pressure spring K81656
27 Handle H39095
28 Steel ball 3/16" N82010
29 Pressure rel. screw H32301
30 Air release screw 35590
31 Washer K80198
32 Washer K80266
33 Cover plug H30642
34 Connector 36590
35 Grease hose B35184
36 End cover B30657
37 Barrel H38004
We also stock parts for rod style guns.
Click her to go back to main Grease Gun page.
GREASE GUN WITH PRESSURE GAUGE 0  600 BAR  CAT. NO. 32393
DIRECTIONS FOR USE
Attention:  Turn Pressure gauge into correct position before achieving pressure.
1. Open air relief screw item 30 (turn to the left).
2. Turn handle with chain item 27, pull back firmly and lock it on to end cover item 36.
3. Turn barrel item 37 to the left to unscrew it from the gun head item 1.
         (only remove end cover item 36 from empty lubricator for cleaning purposes).
4.  Remove empty grease cartridge and take out red piston seal item 17.
5.  Insert new cartridge as follows:
a. Remove loose cap of the grease cartridge and press red piston seal item 17 firmly onto the grease (piston seal must be completely inside the cartridge).                 
b. Push grease cartridge with piston seal in front into barrel item 37.
c. Remove second cap of grease cartridge(with screw driver or knife)
6. Screw together barrel item 37 and gun head item 1.
7. Pull handle with chain item 27 out of catch and let it slide into cylinder item 37.
8. When grease flows constantly out of the side hole of air release valve item 30, close valve.
9. Check if pressure release screw item 29 is closed.
GUN IS NOW READY FOR USE
To produce pressure
Connect the hydr. Connector item 34 with grease hose item 35 onto the high pressure nipple.  Take care that nipple is clean.
Check if pressure release screw item 29 is fully closed.
Turn pressure gauge item 12 into the required position
Operate lever item 2 until gauge indicate required pressure
To release pressure
Turn pressure release screw item 29 to the left and wait until pressure is released.  NEVER unscrew it totally as valve ball item 28 may get lost.
Grease goes directly back onto barrel item 37.
Remove the hydr. Connector from the high pressure nipple by tilting it sideways
Close again the pressure release screw item 29
IMPORTANT:   It is absolutely necessary to follow these instructions, otherwise the hydraulic connector may be damaged.
Troubleshooting
No grease output
a) 
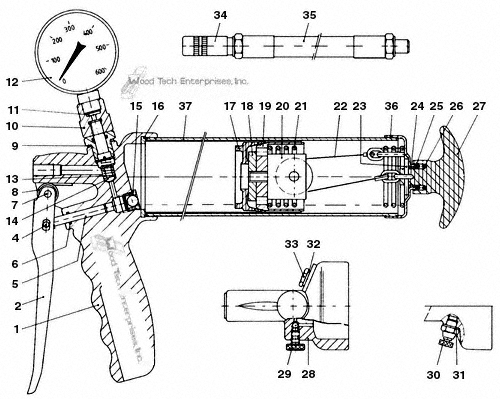
Check if there is grease in cartridge. If handle item 27 can be pulled back without effort i.e. without resistance from spring item 20 then there is still grease in cartridge.  If not, fit new cartridge.
b) Check for trapped air.  Open air release valve item 30 and operate lever item 2 until air free grease is release.  Close valve.
No pressure
a) Check that pressure release screw is tight.
b)Non-return valve item 15 may be dirty.  Pull back handle item 27 and lock chain into end cover item 36.  Unscrew barrel item 37 from head and clean valve item 15.
NOTE:  Do not use metal tools to clean ball valve seating
Pressure rises and falls immediately
a) Valve plug item 14 may be dirty or faulty.  To clean or replace valve plug, unscrew barrel item 37 as previously explained and remove rotary coupling item 10 from gun head.  Operate lever item 2 to eject valve plug item 14 and spring item 13.  Clean valve seating in head and clean or replace plug item 14.  Re-assemble rotary coupling item 10 and barrel item 37.
b) Leakage between hydraulic connector item 34 and flexible hose item 35 may be cured by use of suitable sealant such as Loctite.
Leakage post seal item 6
This may be due to dirty or damaged seal.  To replace seal item 6 press out pin item 7 and withdraw piston item 5 from gun head item 1
Remove x-ring seal item 6 taking care not to damage bore.  Carefully fit new x-ring seal and ensure that it is properly seated in groove.
Re-assemble piston item 5 and pin item 7
NOTE: The longer end or torsion spring item 8 should lie inside lever item 2.


Phone: 336-665-1907 • Fax: 336-665-0576
eMail: Sales@wadkintooling.com

Click here to go to Home Page:
http://www.wadkintooling.com

©2001-2008 - WADKIN NORTH AMERICA, c/o Wood Tech Enterprises, Inc. P.O. Box 2226 Fairview, NC 28730 a division of Wood Tech Enterprises, Inc

Prices are subject to change without notice. All prices are in U.S. Dollars. Wadkin North America, division of Wood Tech Enterprises, Inc. is not responsible for typographical errors.